How to Change Alignment in Excel & Google Sheets
This tutorial shows how to change the alignment of numbers and text in Excel and Google Sheets.
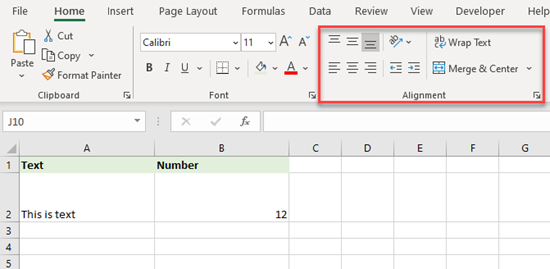
Horizontal and Vertical Alignment
In Excel, all cells are, by default, bottom aligned vertically. Horizontally, text cells are aligned left and number cells right. See this default alignment in the picture above.
To center align cells horizontally:
- Select the range of cells to center (A1:B1).
- In the Ribbon, go to Home > Alignment.
- Click Center.
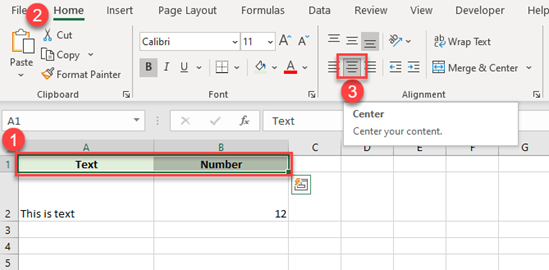
Now cells A1:B1 are center aligned horizontally.
You can also center align cells vertically.
- Select the range of cells (A2:B2).
- Then in the Ribbon, go to Home > Alignment.
- Click Middle Align.
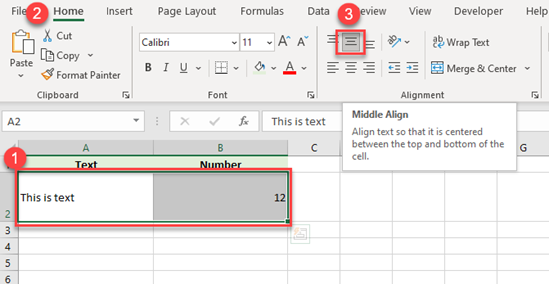
As you can see above, cells A2:B2 are now centered vertically.
Some alignment changes can be made with keyboard shortcuts.
Text Orientation
Using alignment options, you can also change text orientation in a cell. You can display text vertically, rotate it up or down, or display it at a certain angle. Say you want to rotate text in cell A2 counterclockwise.
- Select the cell (A2).
- In the Ribbon, go to Home > Alignment.
- Click the Orientation button.
- Choose Angle Counterclockwise from the options offered.
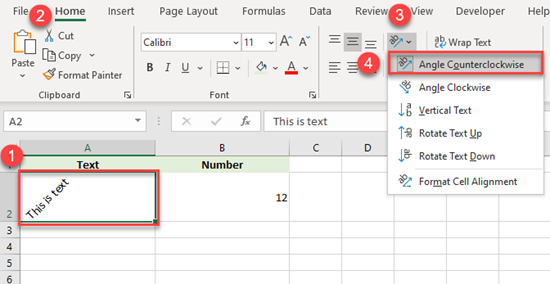
As a result, the text in cell A2 is rotated counterclockwise. If you choose the last option, Format Cell Alignment, you can even define a specific degree of the angle.
Adjust Text Indent
Using the alignment options, you can also adjust the text indent in the cell. You can move the text from the cell border to the left or the right. For example, you can move the text in cell A2 a bit from the left border.
- First, select the cell (A2)
- In the Ribbon, go to Home > Alignment.
- Choose Increase Indent.
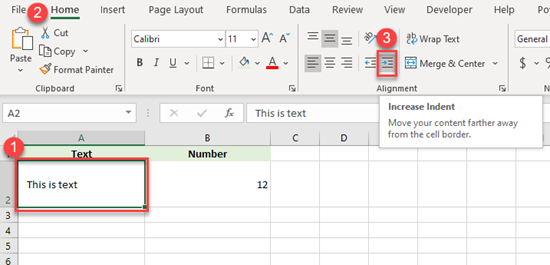
Now, the text in cell A2 is moved a bit from the left border. If you want to get it back to the left, use the Decrease Indent icon.
Wrap Text
Another useful option in the Alignment tab is text wrapping. This is commonly used when text content is wider than the cell. Let’s look at one example.
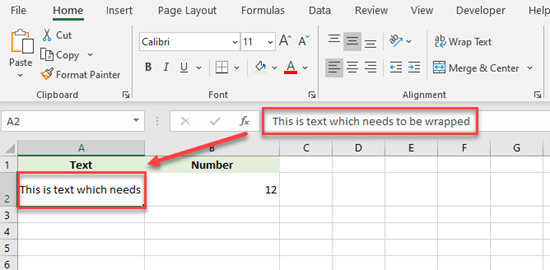
In cell A2 the text is only partially displayed, as there is not enough space in the cell to fit the whole thing. Since there’s enough height in the cell, let’s wrap the text onto two lines.
- Select the text cell (A2).
- In the Ribbon, go to Home > Alignment.
- Click on Wrap Text.
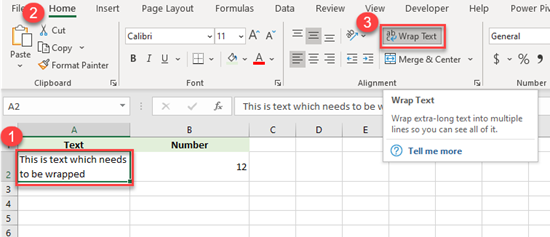
As you can see above, the text is split into two rows and fits the cell width.
Merge and Center
The last option is to merge and center. Using this option, you can merge two or more cells into one. In this case, the content in the upper-left cell is kept and all other content lost. Say you want to merge cells A2 and B2.
- Select the two cells to be merged.
- In the Ribbon, go to Home > Alignment.
- Click on Merge & Center.
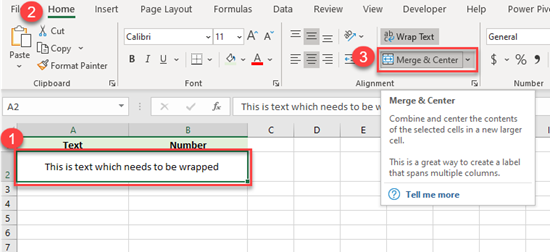
Now, cells A2 and B2 are merged and text from A2 is centered across both cells. As you can see above, text from cell B2 is removed.
Alignment in Google Sheets
All alignment options from Excel are also available in Google Sheets, including horizontal and vertical alignment, text wrapping, merging, and text orientation. Below, we’ll briefly describe how to achieve all of these in Google Sheets.
Horizontal and Vertical Alignment
Similarly, you can horizontally align text to the left, right, or center.
- Select the cell (A2).
- Then in the Toolbar, click on the Horizontal Align button.
- Select Left.

You can also align text vertically.
- Select the cell (A2)
- Then in the Toolbar, click on Vertical Align.
- Click Middle.

Text Wrapping
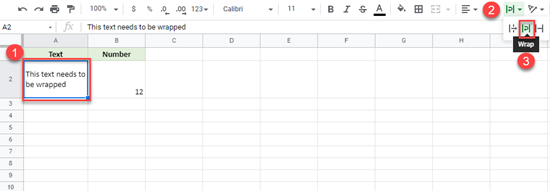
To allow text to wrap onto a second line:
- Select the cell (A2).
- In the Toolbar, click on Text Wrapping.
- Choose Wrap.
Text Orientation
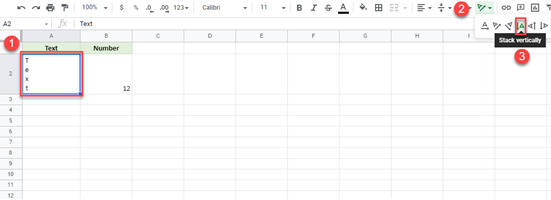
If you want to change text orientation:
-
- Select the cell (A2).
- Then in the Toolbar, click on Text Rotation.
- Choose Stack Vertically.
Text Merging
In Google Sheets, you can also merge cells.
- Select cells that you want to merge (A2:B2).
- In the Toolbar, click Merge Cells.
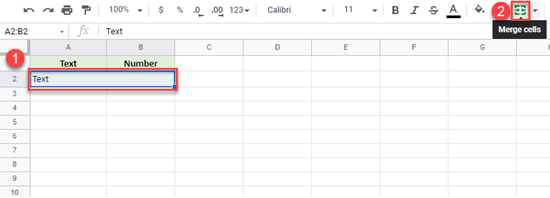
The rules in Google Sheets are the same as those from Excel, so when you merge multiple cells, it only retains content from the upper-left cell; all content from other merged cells is removed.