10 Data Validation Rules & Techniques – Excel & Google Sheets
Data Validation is a tool in Excel that lets you restrict which entries are valid in a cell. Here are 10 rules and techniques to help you make the most out of Data Validation and its many features.
- Use Drop-Down Lists
- Data Validation Based on Another Cell
- ToolTips and Error Messages
- Options and Settings
- Date and Time Formats
- Set a Character Limit
- Validate Phone Numbers and Emails
- Custom Formulas
- Change or Remove Data Validation Rules
- Issues and Fixes

Use Drop-Down Lists
The most useful type of data validation is the drop-down list feature. For instructions on creating a drop-down list, see Create or Add a Drop-Down List in Excel and Google Sheets.

There are plenty of uses for drop-down lists and many ways to create them. For example, a simple yes/no drop-down list like the one below can be added as a quick and dependable indicator in a spreadsheet.

You can also use VBA to create a drop-down list in a cell. Enter this code in the VBA editor:
Sub DropDownListinVBA()
Range("A2").Validation.Add Type:=xlValidateList, AlertStyle:=xlValidAlertStop, _
Formula1:="Orange,Apple,Mango,Pear,Peach"
End Sub
Dynamic Drop-Down Lists
- When you create a drop-down list based on a range of cells using a data validation rule, if the data in that specific range changes, then the values in the drop-down list also change.

- Go a step further with a cascading drop-down list based on the value that is selected in a different list. In the example below, the user has selected LG as the Phone Make. The list of Phone Models then shows only the LG models. If the user were to select either Apple or Samsung, then the list would change to show the relevant models for those makes of phone.

- An alternative method is to use an IF statement within the data validation feature to show a specific list that changes according to what the user selects. In the example below, if the user selects Show Fruit, then the fruit drop-down list is shown, whereas selecting Show Meat brings up the meat drop-down list.

Filter Data With a Drop-Down List
You can use Excel’s filter tool alongside a drop-down list for extended functionality.
- Filters and drop-down lists are similar and even use the same keyboard shortcut (CTRL + SHIFT + L). In a data validation context, the shortcut activates a drop-down menu.

- A drop-down list can also be used as a filter in Excel. It enables you to extract rows of data that match the entry in the drop-down list and return these rows to a separate area of the worksheet.

Drop-Down List Formatting and Display Tools
- If you want to create a drop-down list where the background color depends on the text selected, you can use Conditional Formatting to amend the background color when an item from the list is selected.

- When you create a drop-down list, the default value of the cell where you have placed the list is usually blank. It can be useful to pre-populate this cell with either a default value or a message to the user, such as Select…

- Once you’ve created a drop-down list, you can use the SORT and UNIQUE Functions to sort the drop-down list into alphabetical order.

- To make a drop-down list more readable, you can group a list of items by category (phone models in brand groups, for example).

AutoComplete Drop Down
AutoComplete is a useful feature of Excel in that it can reduce the number of characters you need to type in each cell. The standard data validation drop-down functionality does not support AutoComplete. However, you can learn here how to approximate autocomplete with a drop-down list. Then, when you start typing the first letters of an entry in the drop-down list, the rest of the entry automatically shows up.

Drop Down Populates Another Cell
- Selecting an item from a drop down can populate a different cell in Excel and Google Sheets. For example, in the graphic below, Patel is selected from the list, and the cell below is then populated with the value 34. You can learn how to do this by clicking here.

- Using a drop-down list, you can also insert a picture into another cell automatically.

Data Validation Based on Another Cell
When entering values in Excel, you can restrict the data that is entered into any range of cells based on text or a value held in another cell.

ToolTips and Error Messages
- When you create a drop-down list, you can write a custom input message that is seen on the screen when a cell is selected. This input message can also be referred to as a ToolTip.

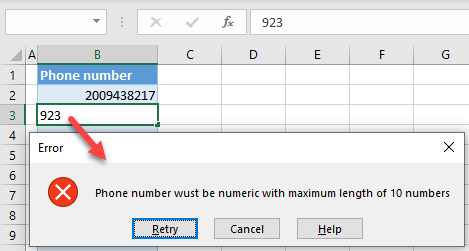
- You can also customize the output (error alert) message that is returned to the user if invalid data is entered into a cell.

Options and Settings
- There are seven different data types you can select from the Allow box of the Validation criteria: Whole number, Decimal, List, Date, Time, Text length, and Custom.
- The Ignore blank option is only available if you are actually editing a cell that has that option switched off.

- You can also choose, when editing a data validation rule, whether or not to apply the changes to other cells with the same settings.
Date and Time Formats
You can use Data Validation to restrict the format entered into a cell to ensure it is a date, and also to restrict the entry to be set between a start date and an end date.

Set a Character Limit
In Excel, the number of characters allowed in a single cell is 32767. However, you can set your own character limit for a text cell.

Validate Phone Numbers and Emails
- You can use Data Validation to ensure that a phone number is entered correctly into Excel.

- You can also use Data Validation to ensure that an email address contains a @ sign and does not have any spaces or commas in it.

Custom Formulas
You can write a custom formula to make your own data validation rules. In the example below, the formula ensures that the data in a cell begins with certain text.

Custom Formula Examples
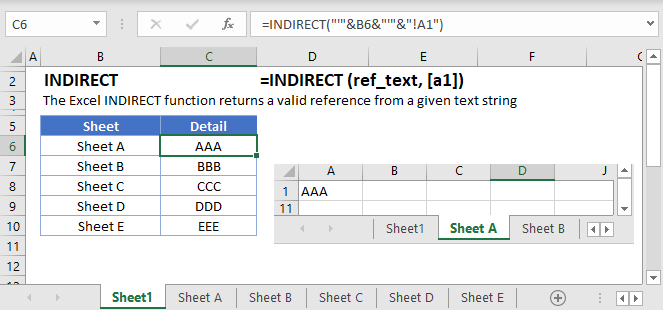
- You can use the INDIRECT Function in Excel in conjunction with a data validation drop-down list to create a cell reference from text.

- Use the ISNUMBER Function to check that the data inputted is in fact, a number. Data Validation has a built-in Whole number option, but you can generalize further with a custom formula.

- Use a the ISTEXT Function to check for text. The example below allows only text values in the cells with data validation applied.

- You can use a data validation drop down with the COUNTIF Function to count cells that meet certain criteria and return a total.

- COUNTIF is also useful for preventing users from entering duplicate values.

- A risk score matrix is a matrix that is used during risk assessment in order to calculate a risk value by inputting the likelihood and consequence of an event. You can use a data validation drop down in conjunction with the VLOOKUP and MATCH Functions to create a risk score matrix.
Change or Remove Data Validation Rules
- If you have a data validation rule set in Excel, you can find any restricted values by selecting Data validation in the Go To Special dialog box.

- You can copy data validation rules from one set of cells to another set of cells by using the Paste Special command (CTRL + ALT + V).

- If you already have rules set up in a worksheet, you can amend the validation rules should your requirements change.

- You can amend the contents of a drop-down list by following the instructions in this tutorial.

- You can easily update (change, extend, or have fewer items) a drop-down list by adding or deleting items from the list’s source range.

- If data validation on a range is no longer required, you can remove it.

- If you no longer require a drop-down list, you can easily remove the data validation settings by following the instructions in this tutorial.

Issues and Fixes
- If you have a value in Google Sheets that does not match the items in your drop-down list (an invalid item), you get a red triangle in the top left corner of the cell. To get rid of this triangle, you can follow the steps in this tutorial.

- There are a number of reasons why your data validation rule or drop-down list is not working correctly. You can troubleshoot these issues by referring to this tutorial.

- A mismatch error can occur when you run VBA code. The error stops your code from running completely and flags the error by means of a message box. One of the ways you can prevent this from happening is to use Data Validation on the spreadsheet to prevent the user from causing worksheet errors in the first place. Only allow them to enter values that don’t cause worksheet errors.
